Many experiments that students do in a biology laboratory are prone to contamination. Contaminants can come from students’ hands, clothes, and even the surrounding air. Experiments involving bacterial culture need to be carefully controlled; otherwise, agar plates will constantly be contaminated, ruining the experiments.
For flawless bacterial culturing, students need to learn and master what are known as Aseptic Techniques. These techniques are used to ensure a "clean" lab environment. It is essential to ensure the reliability of experimental results.
Aseptic techniques are especially important when working with microorganisms. A single spore or tiny bacterium can overgrow your whole medium and destroy entire experiments.
Many reasons contribute to making the aseptic technique a tricky topic. Our top three picks experienced by most educators are discussed below.
If students are to master aseptic techniques, they need to consider a lot of things. In the lab, anything can be a potential contaminant, including the students’ own hands. They need a lot of dexterity and precision to perform aseptic techniques correctly.
Students performing aseptic techniques for the first time are also prone to making mistakes. They may often set down already-sterilized instruments on the lab bench. If they do that, they have to sterilize those objects again. This repetition can become frustrating to students.
A Bunsen burner or alcohol flame is an essential part of aseptic techniques. Fire is dangerous, and students may risk getting burns if they do not exercise caution. They may also inadvertently burn or melt lab equipment if they put them near the open flame for too long.
Aseptic techniques are routine for skilled lab workers. But for students, building that routine takes time and practice. The challenge for educators is to get their students used to standard aseptic procedures until they come naturally to the students.
We've discussed how aseptic techniques could be a tricky topic yet a crucial aspect of microbiology. Here we'll discuss five effective strategies educators could use to make it a more relatable and exciting topic for college/university students.
One way to make this topic more approachable for students is to share fun and interesting facts. Educators would notice promising changes in students' attitudes with these facts in the classroom. These are the basic things to consider when performing aseptic techniques:
Laboratory doors and windows are kept closed to prevent air currents, preventing surface microorganisms becoming airborne.
The wire loop and glass spreader are sterilized before and after use with a Bunsen burner to prevent the introduction of unwanted microorganisms.
Lids from bottles and tubes are held when removed, and not placed on the bench during material transfer from one bottle or tube to another.
The neck of a bottle or tube must be immediately heated using the Bunsen burner so that any air movement is outward.
The bottle or tube are opened for the minimum time possible, and while open, all work is performed close to the Bunsen burner flame.
Media and equipment are sterilized to prevent the growth of unwanted microorganisms.
Teaching and learning aseptic techniques include introducing many terms that students are already familiar with at the college/university level. However, it is a good idea to help students freshen up their memory by revising some core concepts as discussed below:
Aseptic: free from contamination caused by harmful bacteria, viruses, or other microorganisms
Biosafety cabinet: an enclosed, ventilated workspace that provides a sterile environment
Bunsen burner: a device that produces a flame using a mixture of air and a flammable gas
Contaminant: any microorganism not part of the experiment
Microorganisms: include bacteria, fungi, protozoa, viruses, and other organisms invisible to the naked eye but visible under the microscope
Sterile: free from bacteria and other living organisms (similar to the word aseptic)
Sterilization: the process of eliminating microorganisms from lab instruments, usually by passing them through a Bunsen burner flame
The main goal of aseptic techniques is to prevent contamination of cultures. But contaminating microorganisms are too small to see with the naked eye, so students may not be able to appreciate the value of keeping their work areas sterile at all times. It helps to show them photographs of bacteria, fungi, and other potential contaminants to give them a good idea what these are.
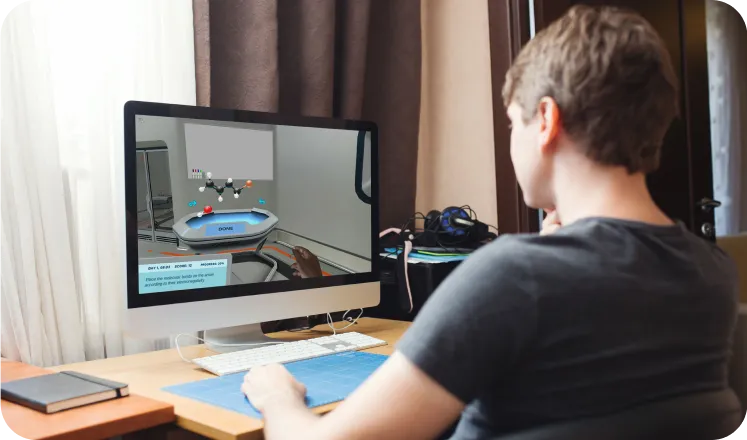
Students are more likely to enjoy reading and learning about things they can see and feel. The visual representations, like the snippet from Labster shown below, make the learning/teaching process fun and rewarding.
The image below depicts a snippet taken from Labster's Aseptic Technique: Culture your sample without contamination Virtual Lab showing the proper way of preparing microbial cultures. Through the interactive demo, students can better understand how to perform aseptic techniques even before they hold a pipette for the first time.
Aseptic techniques are practical skills that students need to master so they can work safely in the lab. It takes time to develop these habits, but as students are practicing, these three helpful mnemonics can make the process easier to remember.
Near the flame is the name of the game. A critical skill for students to keep in mind is working as close to the flame as they can. This way, the work area is always sterile, keeping contaminants away.
Hold it up, do not drop. When removing the lid of a tube, reagent bottle, or petri dish, do not set it back down on the lab bench. Keep it close to the flame along with the mouth of the tube, plate, or bottle.
Hands off. Do not touch the tip of the pipette, the mouth of the tube/bottle/dish, the inside of the lids, or the agar surface. Obviously, do not touch the flame as well.
Spray away. Disinfect the lab bench with a 70% ethanol spray both before and after doing the experiment. Doing this keeps the bench as clean and sterile as possible.
A virtual laboratory simulation is a great way to teach aseptic techniques. At Labster, we're dedicated to delivering fully interactive advanced laboratory simulations that utilize gamification elements like storytelling and scoring systems inside an immersive and engaging 3D universe.
Check out simulations of performing aseptic techniques to culture microorganisms without contamination at Labster. After learning all about it, your students can be more confident when they will do it on their own in a real lab! The GIF below is an example of what students can explore in the simulation.
GIF from Labster's Aseptic Technique: Culturing Your Sample Without Contamination or get in touch to find out how you can start using virtual labs with your students.

Labster helps universities and high schools enhance student success in STEM.
Request DemoRequest a demo to discover how Labster helps high schools and universities enhance student success.
Request Demo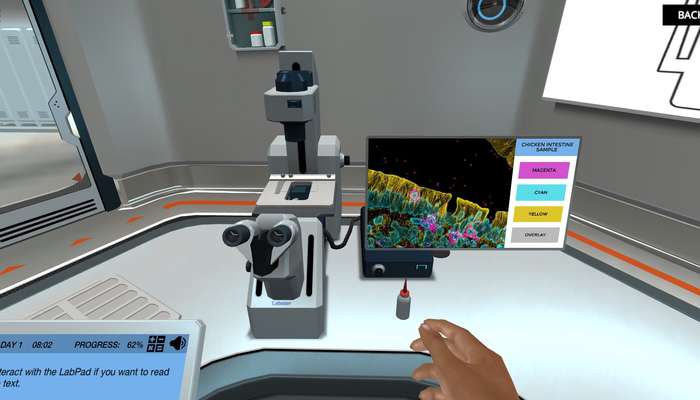


.jpg)