Solving STEM Retention in Online Programs: Experiential Learning That Works
In partnership with WCET, higher education leaders and practitioners explore how experiential learning is transforming the design and delivery of online STEM courses.

Name of the heading
From time to time, there is a need to purify liquids containing non-volatile impurities such as salt or very small amounts of liquids with higher or lower boiling points, or there is a need to separate salt from seawater or sugar from water. The answer is a simple distillation technique!
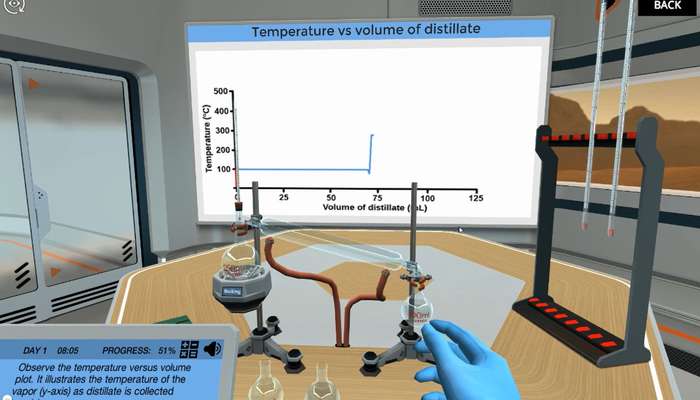
Figure 1: A snippet from simple distillation simulation by Labster showing the condenser tube.
Simple distillation enables a liquid to be separated from a solution. The solution is heated until the solution with the lowest boiling point starts to evaporate. The vapor is cooled and condenses (turning back into a liquid). This liquid can be collected, leaving the rest of the solution back in the flask. The experimental setup for simple distillation is shown below.

Figure 2: Still. 1. The thermometer is directly under the side arm; 2. Distillation flask; 3. heating jacket; 4. condenser; 5. Cooling water outside; 6. cooling water; 7. Receive the Pumpkin.
Students are familiar with the separation of two immiscible liquids, i.e., those that do not mix into one phase, an example is oil and water, where one floats on top of the other, but it is difficult to understand the separation of two or more liquids that appear to be completely soluble, such as water and ethanol. Simple distillation has complex equipment, as shown in Figure 1. How can a teacher help students learn about the parts of this machine and how they work?
See why virtual lab simulations are beneficial not only for your students but also for you as an educator to teach concepts more effectively.
There are three main reasons why simple distillation can be complicated for even bright students.
Simple distillation has a theoretical plate that represents the evaporation-condensation cycle. What happens in simple distillation is that the mixture is heated to reflux, the vapor rises to the top of the glass until it meets cold reflux, and the vapor condenses again and collects in the receiving flask - the condensation-evaporation cycle. Simple distillation is an effective technique for purifying a liquid mixture only if the liquids have very different boiling points (usually a difference of >70 oC).
Interpreting Temperature vs. Distillate Volume Chart: One method you can use to visualize how well a distillate is performing is to plot the volume of the distillate and the temperature at which it was collected. With this data, you can plot a distillation curve of temperature versus volume. In this diagram, the volume of the distillate is plotted on the x-axis, and the temperature on the y-axis. The flat or horizontal part of the curve represents a large number of droplets or volume that accumulates with a slight temperature change This means that a compound is distilled; in other words, the boiling point of the compound.
The vertical part of the curve shows a large temperature change without collecting droplets. It is a transition between the boiling points of two compounds. The temperature sometimes drops just before the transition between the two boiling points. This is because the compound with the lower boiling point is completely removed from the stand and sometimes it may take several minutes for the vapor from the compound with the higher boiling point to reach the thermometer. During this time, when no smoke hits the thermometer, the temperature begins to drop. As soon as the vapor of the compound with the higher boiling point hits the thermometer, the temperature jumps to that boiling point. This drop in temperature before it reaches boiling point is useful because it gives you a clue about when to replace the receiving flask.
The best way to understand what happens during distillation is with a graph called a boiling point composition curve. The boiling point composition curve for a two-component mixture has the temperature on the y-axis and the mole percent of one component on the x-axis. The lower curve on the boiling point composition diagram is called the liquid composition line. This line shows the mole percent of the compound when it is in the liquid phase at a given temperature. The highest curve is called the vapor composition line. This series shows the mole percent of compounds when they are in the vapor phase at a given temperature.
Be aware that the composition of liquids and vapors differs at different temperatures because some compounds are more volatile than others; have a lower boiling point. Steam is always enriched with lower boiling point compounds.
The boiling point composition curves for a mixture of cyclohexane and toluene are shown below.

To use a boiling point composition curve, you must first determine the mole percentage of one of your compounds in a two-component mixture.
In the example above, determine the mole percentage of cyclohexane in your mixture. The mole percentage is calculated by dividing the moles of a substance by the total number of moles in solution (moles of both substances) x 100%. This figure tells you where to start on the x-axis of the boiling point composition curve.
When doing simple distillation, you heat the mixture so that the temperature rises. The temperature increases until it reaches the liquid composition line. This is the temperature at which the mixture will begin to boil.
Note that this graph assumes an atmospheric pressure of 760 mm Hg. When a substance begins to boil, its temperature remains constant, liquid to gas. To visualize it on a boiling point composition curve, you must draw a horizontal line from the liquid composition curve to the vapor composition curve. If you trace from the intersection of your horizontal line with the vapor composition line, you can determine the mole percentage of the compound in the vapor phase at that temperature.
With those points in mind, here are five things you can incorporate into your simple distillation class to make it more engaging, accessible, and fun for you and your students.
The earliest evidence of distillation is found on Akkadian tablets from around 1200 BC. SM, Description of Perfume. The tablets provide textual evidence that an early form of distillation was known to the Babylonians of ancient Mesopotamia. Early evidence of distillation was also found in connection with alchemists working in Alexandria, Roman Egypt in the 1st century AD.
Using the cyclohexane/toluene example again, if you start with a 50 mol% solution of cyclohexane in toluene, you can see from the boiling point composition curve that the liquid boils at about 91°C and the vapor composition is about 80% cyclohexane. The figure below shows the theoretical tray - evaporation-condensation cycle.

The boiling point of a liquid is the temperature at which the vapor pressure of the liquid is equal to the external pressure - the external pressure is the atmospheric pressure when the flask is opened to it. For example, ethanol and water have very different boiling points; the normal boiling point of water is 100 °C, while the boiling point of pure ethanol is 78.5 °C. The solution with the lowest boiling point first reaches its boiling point and begins to evaporate, then, it can be condensed and collected, and the mixture separated.
The normal boiling point is defined as the boiling point of a liquid at an external pressure of 1 atmosphere or 760 mm Hg. This is the boiling point of a liquid at sea level. Realize that the actual boiling point of a liquid changes with atmospheric pressure. Atmospheric pressure decreases with altitude.
Simple distillation separates substances in a mixture with very different boiling points, whereas fractional distillation is used for mixtures containing chemicals with similar boiling points.
The second difference between fractional distillation and simple distillation is the addition of a fractionating column between the heated vessel and the steam condensing. The column is filled with a material such as a thin metal wire or glass beads which encourages condensation because it has a large surface area. As the vapors rise through the fractionating column, they condense into a liquid on the cooler surface of these materials. Hot steam rising from below causes this liquid to evaporate, condense, evaporate, and so on. Each evaporation produces vapor with a higher proportion of vapor pressure molecules. Fractional distillation thus achieves superior separation with less material loss since one operation is equivalent to several simple distillation cycles.
An easier way to teach simple distillation is to use a virtual laboratory simulation. At Labster, we strive to provide highly interactive lab presentations that use game-based elements such as storytelling and scoring systems in an immersive 3D world.
Check out Labster's Simple Distillation Simulation, which allows students to learn about simple distillation through active inquiry-based learning. In the simulation, students embark on a mission to use the distillation technique to separate and recycle the waste compounds generated by the production of biodiesel from algae (water, glycerol, and methanol) so they can be re-utilized.
Lorem ipsum dolor sit amet, consectetur adipiscing elit, sed do eiusmod tempor incididunt ut labore et dolore magna aliqua. Ut enim ad minim veniam, quis nostrud exercitation ullamco laboris nisi ut aliquip ex ea commodo consequat. Duis aute irure dolor in reprehenderit in voluptate velit esse cillum dolore eu fugiat nulla pariatur.
Block quote
Ordered list
Unordered list
Bold text
Emphasis
Superscript
Subscript
See our plan options, learn more about virtual labs, and find out how easy it is to get started with Labster.